
Page 82 - The Tent Handbook 2017
P. 82
Tips for using your tent
Comfort “upgrade”
All of our tents are built to be comfortable for their stated number of occupants plus gear. To get more comfort, one option for 2 people is to choose the Staika or Kaitum 2. Both of these tents are designed specifically to be extra roomy for 2 people. Another easy option is to choose a 3 person tent for 2, or a 4 person for 3. The extra space comes with very little extra weight, and can be especially welcome on gear intensive outings, for winter camping, or anytime you just want a bit of luxury! For solo travelers, choosing a Nallo 2 for all season use, or the Rogen or Anjan 2 for warmer weather trips offers the same deluxe option, again with very little weight penalty.
Using a Footprint
123
Projectinlandice.com
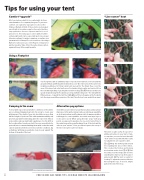
“Line runner” knot
1
2
3
4
5
This knot is quite useful. It is good for adding extra lines to your tent or tarp, or any time you need a knot that will “lock” under load, will still slide easily for adjustment, yet is quick to untie.
1 & 2 Wrap the working end around the standing line two or three times. This creates the friction and locking mechanism under load. 3 & 4 Pull the end across the wraps and over the standing line, make a loop then pass it underneath. 5 The knot is ready for loading. To adjust the tension, slide the knot along the rope. To loosen, simply pull on the end of the loop.
4
Camping in the snow
To deal with exposed, bad weather conditions in the winter, we recommend digging down into the snow to create your pitching spot. The depth of your site should be no more than half the height of your tent. This adds maximum stability and prevents any wind from blowing under the outer tent. If this is not possible, and you must build a wall, place it so the drift on the lee side will not reach your tent. If you use snow blocks for your wall, we recommend making them wide so that the wind cannot easily knock them over. In less extreme conditions, dig a shallower pitching area and pile snow loosely against the bottom of the walls of the tent.
Our Footprints add an additional layer of protection between your tent and the ground. In Black and Red Label models, they cover the entire area of the outer tent, including vestibules. In Yellow Label tents (except for the Enan), they cover the area of the inner tent only. In all cases, Footprints attach easily, and can be left on thetentwhenpitchingorpackingthetentintoitsbag. 1 & 2 Firstlayoutthetent, upside down, then lay the Footprint out on top, with the shiny side – the side with the Hilleberglogo–towardsthetentfloor. 3 & 4 InserttheredtogglesontheFootprint into the rings around the perimeter of the tent. Turn the tent over and pitch as usual.
Alternative peg options
Sometimes you need more pegs than you have, and you must improvise. In the winter, skis provide excellent peg capability, as do ski poles when used Deadman-style. In warmer weather, trekking poles, canoe paddles, trees and even large logs or rocks can be used. When using alternate “pegs” with peg points, as opposed to guy lines, tie one end of a short line to the metal ring on the peg attachment loop of the tent and the other to your “anchor.” It is a good idea to put rocks on top of the line to keep the outer tent down.
Peter Marshall
Hilleberg Archive
Marco Hummelink/marcohummelink.nl
82
for videos and more tips, see our website hilleberg.com
